

How To Repair Scratches In Poly Guitar Finish With Micro Mesh
When someone buys a new piece of engineering, the commencement affair they tend to do is plug information technology in and start using information technology. Updating things like the firmware tends to get ignored virtually of the time, but information technology shouldn't. Updating the firmware can bring in new features and fix known bugs making information technology well worth doing the upgrade. That said, in some cases, the manufactures firmware may non be the best choice.
Hither are the steps to install custom Marlin firmware on a 32-bit Creality board.
- Install Visual Studio Code
- Download Marlin Firmware and Configuration Examples
- Copy Configuration Files to the Marlin Firmware Directory
- Update the platformio.ini File
- Update the Marlin Configuration
- Build the Firmware
- Copy the Firmware to an SD Card
- Install the Firmware on the Printer
*This procedure assumes you accept a Creality 32-fleck mainboard and program to Marlin firmware on information technology. If you are looking to run the prebuilt Cerality firmware, yous should follow this guide, "Creality 32-Scrap Mainboard Firmware Upgrade Guide".
** This process has been tested using the Creality 4.two.2 and four.2.vii mainboard.
Why Move to the Marlin Firmware?
The Marlin firmware is has been effectually a while and has a large user customs backside it, meaning you can get support and bugs fixed if needed. Also, information technology's free, compatible with most with a wide range of mainboards, and has frequent updates.
Y'all can also download a copy of Marlin I built with the required changes and use supplied configs as a starting betoken. The firmware is available to download from "3D Printscape Marlin Builds".
Stride-past-Step Firmware Upgrade Guide
Requirements
Required Hardware
- Creality printer with 4.2.2 or iv.2.7 mainboard
- Micro SD card *8GB or smaller
- SD Card Reader
- BLTouch
- Computer
*Links are to Amazon and for the products I employ.
Required Software
- Visual Studio Code
Footstep-by-Step Guide
If you run across an issue or need assistance, join us on Discord.
Install Visual Studio Code
The get-go affair you lot need to do is download and install Visual Studio Code (VS Lawmaking). Assuming you lot are not doing annihilation out of the ordinary, the install process tends to be quick and easy.
Follow these steps to install VS Code
- Download VS Lawmaking for the operating organisation you are running.
- Run the VS Code installer using the default values provided
- Launch VS Lawmaking
Install Platform.io
Once y'all take VS Lawmaking installed, you lot will need to install the Platform.io plugin. To do this, you will desire to click on Extensions on the left side menu and search for platform.io. You volition see PlatformIO IDE come up up in the search results. Click on that and so click install.
The install process will run in the background and update y'all with a notification at the bottom right of the VS Code user interface when it's done. Once washed, you will desire to restart VS Code.
Download Marlin Firmware and Configuration Examples
Next, we volition demand to download the firmware nosotros program on using. At that place are ii things we need to get from there, the firmware and the configuration example.
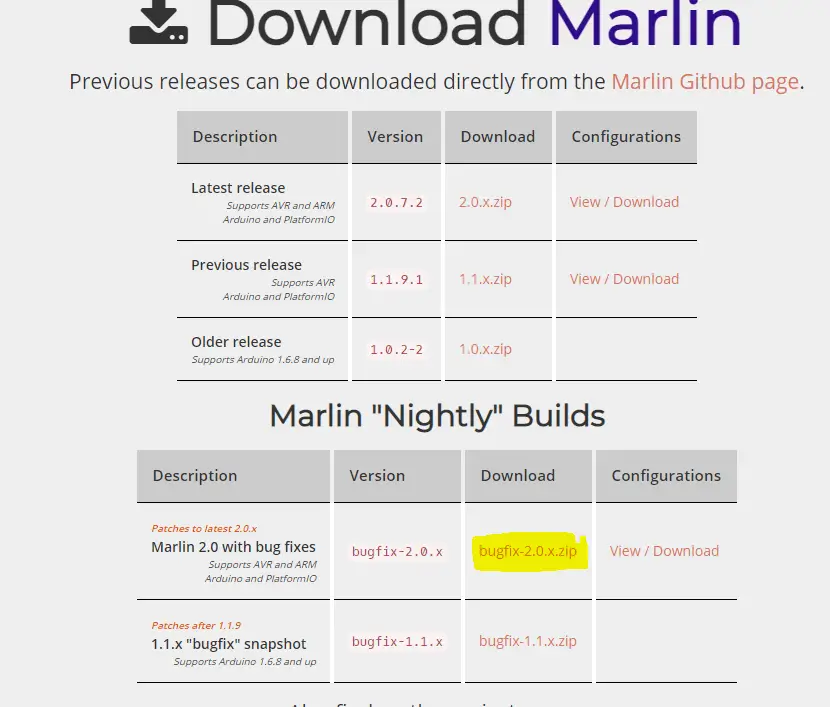
Firmware
To do that, get to the Marlin download site and download both bugfix-2.0.ten.zero, shown below.
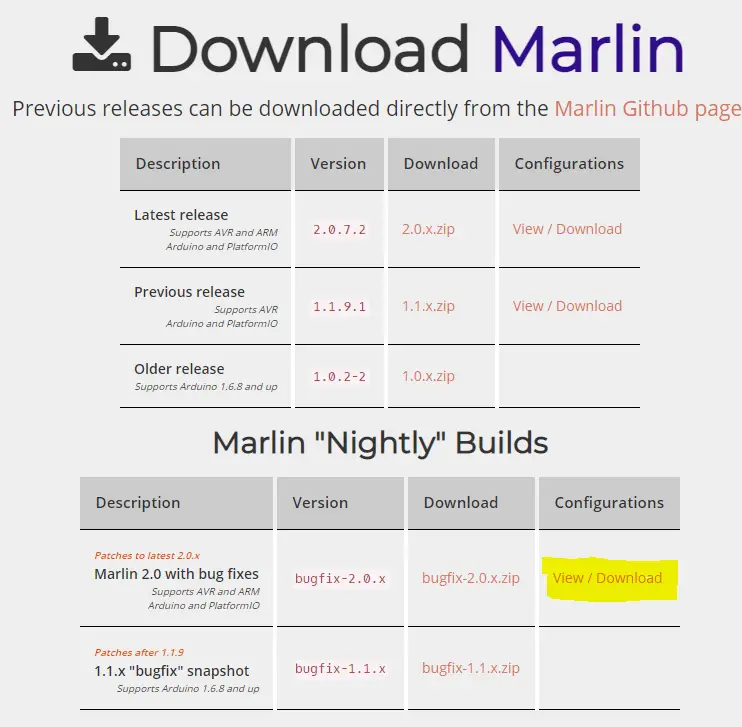
Configuration Examples
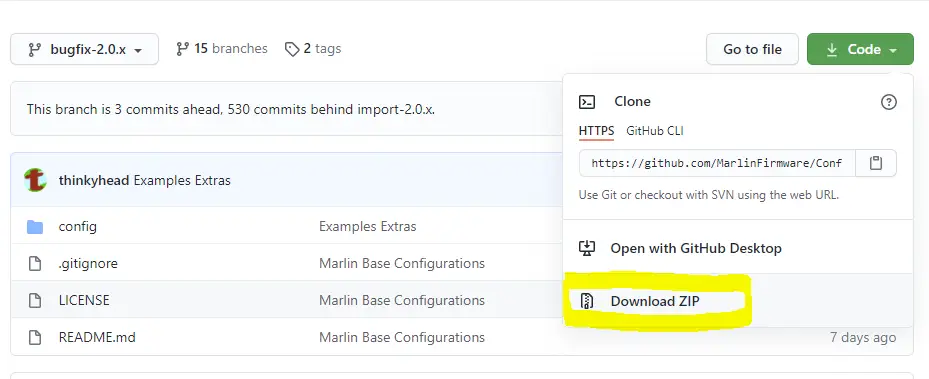
To get the example configurations, click on View/Download next to the firmware you just downloaded to become to the GitHub folio. And then click on the green code push and click Download Goose egg.
Unzip Files
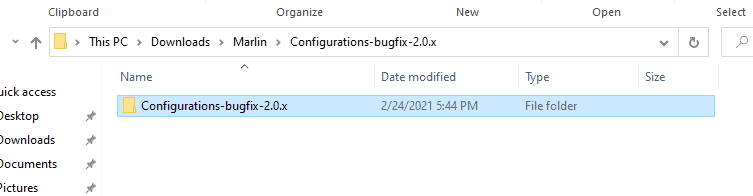
Now that we take downloaded both packages we demand, yous volition want to unzip them. You lot can unzip both files in the location they are in, only you lot will want to motility the unzipped firmware to your desktop or somewhere closer to the root of the drive. The firmware needs to be shut to the root of the drive to prevent any upshot around the length of the file path.
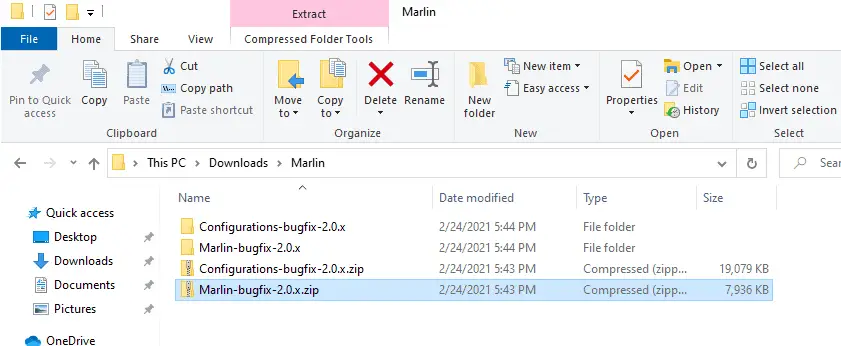
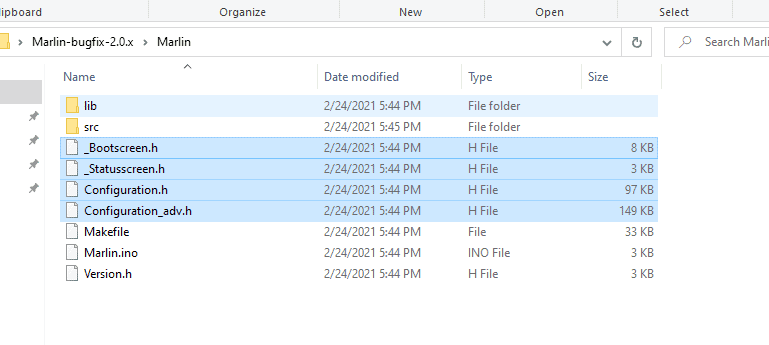
Copy Configuration Files to the Marlin Firmware Directory
Now we will desire to re-create the example configs from the example directory to the Marlin binder in the firmware directory, in my case, "C:\Users\Possessor\Desktop\Marlin-bugfix-2.0.10\Marlin".
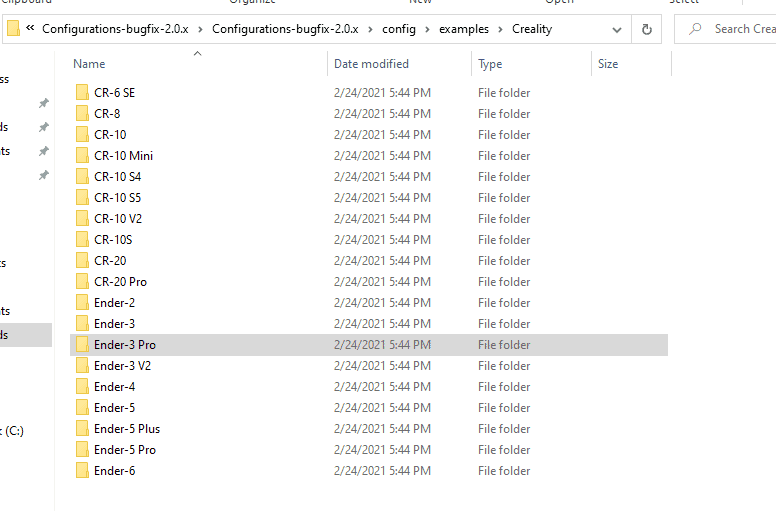
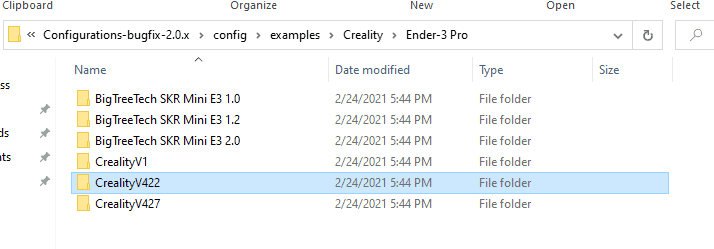
You will find the instance configs in the Configurations-bugfix-2.0.x binder that you extracted. In one case in that folder, you will want to go the examples for the printer you are working with. I have the Ender 3 Pro with the 4.2.two board, then that'due south what I will exist looking for and can be plant in the Creality folder. From there, I demand to go into the binder for the board I'm using.
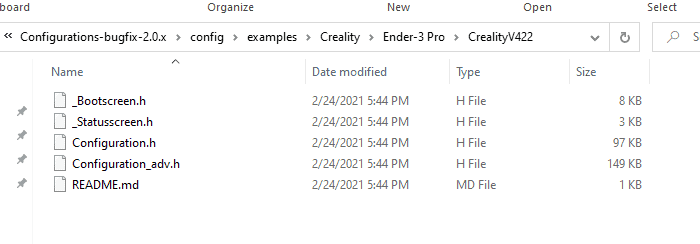
In that folder, you will notice 4 config files ending with .h. You want to re-create those files to the Marlin folder mentioned above, overwriting any files that already exist.
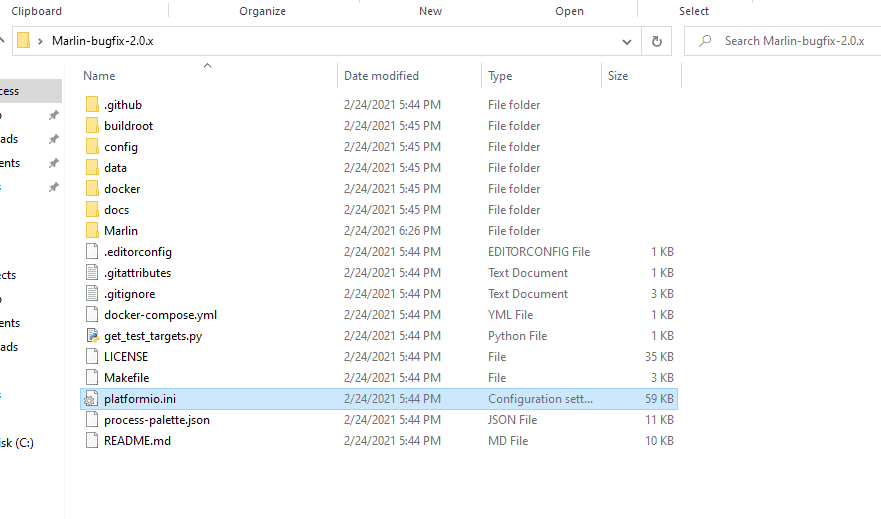
Update the platformio.ini File
Side by side, we will want to update the default_envs value in the platformio.ini file that is in the root directory of the firmware.
| Default Value | New Value |
|---|---|
| default_envs = mega2560 | default_envs = STM32F103RET6_creality |
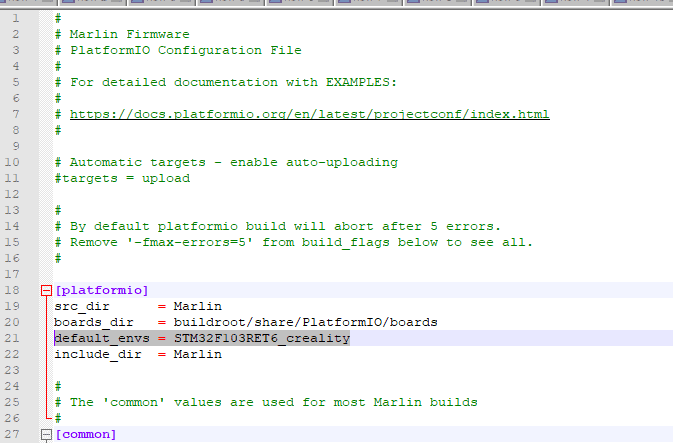
*** If your printer was purchased in 2022 you may have the RCT6 chip (or 256k). If you practise, you will want to use STM32F103RC_creality. Yous can follow this video to run across what fleck yous accept.
Make sure to relieve the file after you make the change.
Update the Marlin Configuration
Load Firmware into VS Code
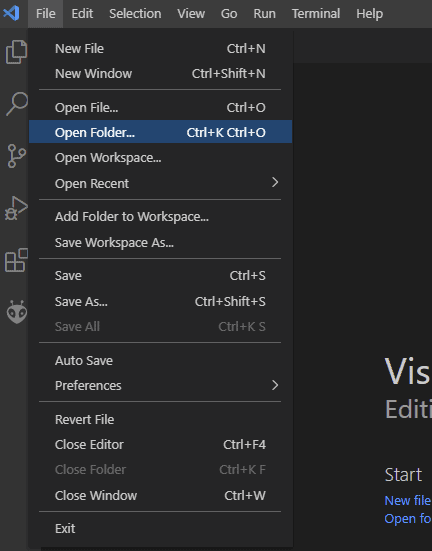
The next affair you will want to do is load the firmware into VS Lawmaking to brand the necessary changes and build it. To practice that, you volition want to follow these steps.
- Open up VS Code
- Go to File – Open Folder
- Browse to the firmware binder and click Select Folder
Recommended Changes
Now I will go over the changes you should make if regardless of the mods y'all are running. If you have the BLTouch, you volition want to make these changes and the changes in the adjacent section.
Configuration.h Changes
Path: Marlin\Configuration.h
| Default Value | New Value | Notes |
|---|---|---|
| #define CUSTOM_MACHINE_NAME "Ender-3 Pro V1.five" | #define CUSTOM_MACHINE_NAME "CUSTOM VALUE HERE" | Repalce "CUSTOM VALUE Hither" with what you want on the display. |
| //#define S_CURVE_ACCELERATION | #define S_CURVE_ACCELERATION | |
| //#define LEVEL_BED_CORNERS | #define LEVEL_BED_CORNERS | |
| //#define INDIVIDUAL_AXIS_HOMING_MENU | #define INDIVIDUAL_AXIS_HOMING_MENU | |
| #alarm "Creality 4.ii.two boards may have A4988 or TMC2208_STANDALONE drivers. Check your board and make sure to select the correct DRIVER_TYPE!" | //#warning "Creality 4.2.two boards may take A4988 or TMC2208_STANDALONE drivers. Check your board and brand sure to select the correct DRIVER_TYPE!" | Verify the driver is correct, then comment out this line |
*You should also make whatsoever additional changes you desire/need to at his point.
Required Changes if Running a BLTouch
If you take the BLTouch, you lot will desire to make these changes every bit well.
Configuration.h Changes
Path: Marlin\Configuration.h
| Default Value | New Value | Notes |
|---|---|---|
| #define Z_MIN_PROBE_ENDSTOP_INVERTING fake | #define Z_MIN_PROBE_ENDSTOP_INVERTING true | Merely needed if using a build before July 2022. You lot will go an error if using this on a later build. |
| //#define BLTOUCH | #define BLTOUCH | |
| #define NOZZLE_TO_PROBE_OFFSET { 10, 10, 0 } | #define NOZZLE_TO_PROBE_OFFSET { X, Y, 0 } | Ten & Y should exist replaces with your offsets |
| //#define AUTO_BED_LEVELING_BILINEAR | #define AUTO_BED_LEVELING_BILINEAR | |
| //#define Z_SAFE_HOMING | #define Z_SAFE_HOMING |
If you lot take z-stop and bltouch probe both plugged in, make these changes also.
| Default Value | New Value |
|---|---|
| #ascertain Z_MIN_PROBE_USES_Z_MIN_ENDSTOP_PIN | //#ascertain Z_MIN_PROBE_USES_Z_MIN_ENDSTOP_PIN |
| //#define USE_PROBE_FOR_Z_HOMING | #ascertain USE_PROBE_FOR_Z_HOMING |
Configuration_adv.h Changes
Path: Marlin\Configuration_adv.h
| Default Value | New Value | Notes |
|---|---|---|
| //#define BLTOUCH_DELAY 500 | #define BLTOUCH_DELAY 500 | |
| //#define BLTOUCH_FORCE_SW_MODE | #define BLTOUCH_FORCE_SW_MODE | |
| //#define BLTOUCH_HS_MODE | #define BLTOUCH_HS_MODE | This is optional just will speed things up. |
| //#define PROBE_OFFSET_WIZARD | #define PROBE_OFFSET_WIZARD | |
| // #define PROBE_OFFSET_WIZARD_START_Z -4.0 | #ascertain PROBE_OFFSET_WIZARD_START_Z -4.0 | |
| //#ascertain BABYSTEP_DISPLAY_TOTAL | #ascertain BABYSTEP_DISPLAY_TOTAL | |
| // #define BABYSTEP_ZPROBE_OFFSET | #define BABYSTEP_ZPROBE_OFFSET |
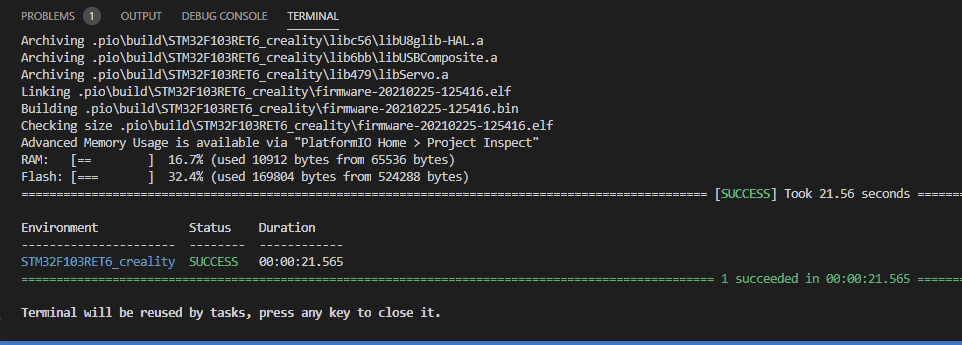
Build the Firmware
Once all your changes have been made, you lot will want to click on the checkmark in the lesser left of the VS Code user interface. That will kick off the build and shouldn't take longer than a couple of minutes to consummate. You should encounter success in the final window if everything worked. If it didn't, you volition exist able to become the fault from at that place to troubleshoot.

Copy the Firmware to an SD Card
One time the firmware has been successfully built, you will want to drag it to an empty SD card that is nether 8GB or less.
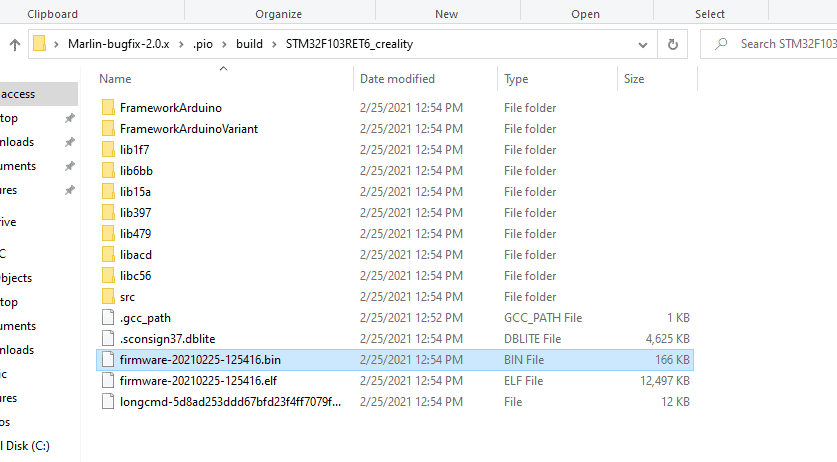
Y'all can find the firmware under "firmware\.pio\build\STM32F103RET6_creality" , firmware should be replaced with the path where you have the firmware. In my case, the path is "C:\Users\Owner\Desktop\Marlin-bugfix-ii.0.x\.pio\build\STM32F103RET6_creality".
The file name will be firmware-date-randomnumber.bin, so firmware-20210225-125416.bin for me.
Install the Firmware on the Printer
This step sounds harder than information technology actually is. Bold you copied the right file to an empty SD card, all you demand to do is put the SD card in the printer and power it on. From at that place, the printer will pull the file and install information technology on the printer. The entire process should take less than thirty seconds. One time the printer boots into the standard interface, you lot tin can remove the SD bill of fare.
Related Questions
What if I accept an viii-bit Creality mainboard? – You will need to install a bootloader on the printer, so push the firmware to it. I created a video covering the procedure of migrating to the TH3D firmware on an eight-bit lath that you tin see here.
What if I want to add together a BLTouch? – I created a video roofing the process from commencement to finish that you lot can run into below or can take a expect at the article that I wrote that covers the procedure "Guide to Install a BLTOUCH on a Creality 32-bit Mainboard" .
Exercise I need to recalibrate my e-steps subsequently changing the firmware? – I would recommend doing and so to make sure everything is working as expected. Hither is a video and article roofing the process "3D Printer East-step Calibration (Step-by-Pace Guide)".
Related Articles
- Creality 32-Flake Mainboard Firmware Upgrade Guide
- Create a Temperature Belfry Using Cura – The Easy Way
- Cura Profiles
- 3D Printscape Marlin Builds
Recap
If you are looking at making modifications to your 3d printer, yous will near likely demand to run a custom firmware build. Moving to the Marlin firmware gives yous a bang-up customs, more features, and the ability to customize the configuration to meet your needs. The process may look a picayune intimidating, merely it'south actually not that bad, and at that place are a lot of people able to help out if you run into issues.
Make sure you check out our YouTube channel, and if you lot would like any additional details or have any questions, please leave a annotate below or bring together us on Discord. If you liked this commodity and desire to read others click here.

Source: https://3dprintscape.com/marlin-firmware-on-creality-board-complete-guide/
Posted by: beverlyhiscall.blogspot.com
0 Response to "How To Repair Scratches In Poly Guitar Finish With Micro Mesh"
Post a Comment